0:{"root":[["$","meta","1",{"property":"csp-nonce","nonce":"1abb2a9d-7965-45cb-a673-7c68be2e27de"}],"$L1"],"formState":"$undefined","returnValue":"$undefined"}
2:"$Sreact.fragment"
3:I["7ada5cab5be8",[],"Header",1]
4:"$Sreact.suspense"
:HL["/assets/_layout-BzYdn0f6.css","stylesheet"]
1:["$","$2","2",{"children":[[["$","link","css:/assets/_layout-BzYdn0f6.css",{"rel":"stylesheet","precedence":"vite-rsc/importer-resources","href":"/assets/_layout-BzYdn0f6.css","data-rsc-css-href":"/assets/_layout-BzYdn0f6.css"}],"$undefined"],["$","html",null,{"lang":"en","className":"$undefined","children":[["$","head",null,{"children":[["$","meta",null,{"charSet":"UTF-8"}],["$","meta",null,{"name":"viewport","content":"width=device-width, initial-scale=1.0"}],["$","link",null,{"rel":"icon","type":"image/png","href":"/static/icons/apple-icon.png"}],["$","link",null,{"rel":"icon","type":"image/png","sizes":"32x32","href":"/static/icons/favicon-32x32.png"}],["$","link",null,{"rel":"apple-touch-icon","href":"/static/icons/apple-icon.png"}],["$","meta",null,{"name":"theme-color","content":"#1e40af"}],["$","meta",null,{"name":"language","content":"en_US"}],["$","meta",null,{"httpEquiv":"content-language","content":"en_US"}]]}],["$","body",null,{"className":"min-h-screen flex flex-col","children":[["$","$L3",null,{}],["$","main",null,{"className":"main-content grow bg-gray-100","children":["$","$4",null,{"fallback":[[["$","link","css:/assets/_layout-BzYdn0f6.css",{"rel":"stylesheet","precedence":"vite-rsc/importer-resources","href":"/assets/_layout-BzYdn0f6.css","data-rsc-css-href":"/assets/_layout-BzYdn0f6.css"}],"$undefined"],["$","div",null,{"className":"flex justify-center items-center p-8","children":["$","div",null,{"className":"animate-spin rounded-full h-8 w-8 border-b-2 border-indigo-600"}]}]],"children":[[["$","title",null,{"children":"FLV Editor for Mac Edit FLV Convert FLV with Mac FLV Editor | Gleez"}],["$","meta",null,{"name":"description","content":"**FLV Editor for Mac** helps you create excellent FLV videos with little prior computer video experience. It is a hassle-free task to ..."}],["$","meta",null,{"name":"keywords","content":"flv, editor, mac, edit, convert, Gleez, privacy, secure productivity"}],["$","meta",null,{"name":"author","content":"Caty"}],["$","meta",null,{"property":"og:title","content":"FLV Editor for Mac Edit FLV Convert FLV with Mac FLV Editor | Gleez"}],["$","meta",null,{"property":"og:description","content":"**FLV Editor for Mac** helps you create excellent FLV videos with little prior computer video experience. It is a hassle-free task to ..."}],["$","meta",null,{"property":"og:type","content":"article"}],["$","meta",null,{"property":"og:url","content":"https://gleez.com/s/flv-editor-for-mac-edit-flv-convert-flv-with-mac-flv-editor"}],["$","meta",null,{"property":"og:image","content":"/static/og.png"}],["$","meta",null,{"property":"og:image:alt","content":"FLV Editor for Mac Edit FLV Convert FLV with Mac FLV Editor"}],["$","meta",null,{"property":"og:site_name","content":"Gleez"}],["$","meta",null,{"property":"og:locale","content":"en_US"}],["$","meta",null,{"property":"article:published_time","content":"2009-03-20T15:06:25.000Z"}],["$","meta",null,{"property":"article:modified_time","content":"2018-12-31T17:59:33.000Z"}],["$","meta",null,{"property":"article:author","content":"https://gleez.com/author/73463704322454"}],[],["$","meta",null,{"name":"twitter:card","content":"summary_large_image"}],["$","meta",null,{"name":"twitter:title","content":"FLV Editor for Mac Edit FLV Convert FLV with Mac FLV Editor | Gleez"}],["$","meta",null,{"name":"twitter:description","content":"**FLV Editor for Mac** helps you create excellent FLV videos with little prior computer video experience. It is a hassle-free task to ..."}],["$","meta",null,{"name":"twitter:image","content":"/static/og.png"}],["$","meta",null,{"name":"twitter:image:alt","content":"FLV Editor for Mac Edit FLV Convert FLV with Mac FLV Editor"}],["$","meta",null,{"name":"twitter:site","content":"@gleeztech"}],["$","meta",null,{"name":"twitter:creator","content":"@gleeztech"}],["$","link",null,{"rel":"canonical","href":"https://gleez.com/s/flv-editor-for-mac-edit-flv-convert-flv-with-mac-flv-editor"}],["$","meta",null,{"name":"robots","content":"index, follow"}],["$","meta",null,{"name":"googlebot","content":"index, follow, max-snippet:-1, max-image-preview:large"}],["$","script",null,{"type":"application/ld+json","dangerouslySetInnerHTML":{"__html":"{\"@context\":\"https://schema.org\",\"@type\":\"BlogPosting\",\"headline\":\"FLV Editor for Mac Edit FLV Convert FLV with Mac FLV Editor\",\"description\":\"**FLV Editor for Mac** helps you create excellent FLV videos with little prior computer video experience. It is a hassle-free task to ...\",\"image\":\"/static/og.png\",\"author\":{\"@type\":\"Person\",\"name\":\"Caty\"},\"publisher\":{\"@type\":\"Organization\",\"name\":\"Gleez\",\"logo\":{\"@type\":\"ImageObject\",\"url\":\"https://gleez.tech/static/logo-512.png\"}},\"datePublished\":\"2009-03-20T15:06:25.000Z\",\"dateModified\":\"2018-12-31T17:59:33.000Z\",\"mainEntityOfPage\":{\"@type\":\"WebPage\",\"@id\":\"https://gleez.com/s/flv-editor-for-mac-edit-flv-convert-flv-with-mac-flv-editor\"}}"}}]],"$L5"]}]}],"$L6"]}]]}]]}]
7:T40e,data:image/svg+xml;utf8,%3Csvg%20width%3D%2232%22%20height%3D%2232%22%20viewBox%3D%220%200%2032%2032%22%20%0A%20%20%20%20%20%20%20%20%20xmlns%3D%22http%3A%2F%2Fwww.w3.org%2F2000%2Fsvg%22%20role%3D%22img%22%20aria-label%3D%22Avatar%20for%20Caty%22%3E%0A%20%20%20%20%20%20%3Crect%20width%3D%22100%25%22%20height%3D%22100%25%22%20fill%3D%22hsl(251%2C%2081%25%2C%2051%25)%22%20rx%3D%223.2%22%20%2F%3E%0A%20%20%20%20%20%20%3Ctext%20x%3D%2250%25%22%20y%3D%2250%25%22%20%0A%20%20%20%20%20%20%20%20%20%20%20%20font-family%3D%22sans-serif%22%20%0A%20%20%20%20%20%20%20%20%20%20%20%20font-size%3D%2212.8%22%20%0A%20%20%20%20%20%20%20%20%20%20%20%20font-weight%3D%22bold%22%20%0A%20%20%20%20%20%20%20%20%20%20%20%20fill%3D%22%23FFFFFF%22%20%0A%20%20%20%20%20%20%20%20%20%20%20%20text-anchor%3D%22middle%22%20%0A%20%20%20%20%20%20%20%20%20%20%20%20dominant-baseline%3D%22central%22%0A%20%20%20%20%20%20%20%20%20%20%20%20style%3D%22user-select%3A%20none%3B%22%3E%0A%20%20%20%20%20%20%20%20C%0A%20%20%20%20%20%20%3C%2Ftext%3E%0A%20%20%20%20%3C%2Fsvg%3E8:Tce9,FLV Editor for Mac helps you create excellent FLV videos with little prior computer video experience. It is a hassle-free task to edit your FLV files with Mac FLV Editor. The editing features include: Split FLV video into scenes, Merge multiple FLV files into one, Crop FLV removing black bars, Apply special effects to FLV, and so forth. Now, personalize your FLV videos with FLV Editor for Mac!
Key features:
-
Edit FLV Video Easily
Edit your FLV videos in an easiest way even without video editing skills.
-
Split Video
Select your most-wanted parts and delete unnecessary ones.
-
Merge into One File
Merge all imported FLV video files into one.
-
Crop Video
Remove black bars around the video, only remain the necessary parts.
-
Customize Video Effects
Set FLV video brightness, contrast, saturation, and apply special video effects to FLV video files.
-
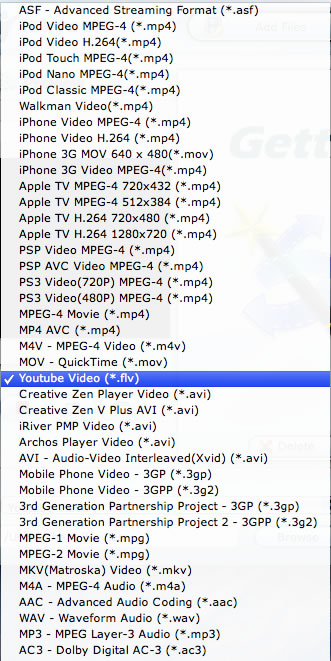
Output FLV to Various Formats
Save projects to AVI, MPG, WMV, MP4, 3GP, 3G2, MOV, Divx, Xvid, VOB, RM, etc.
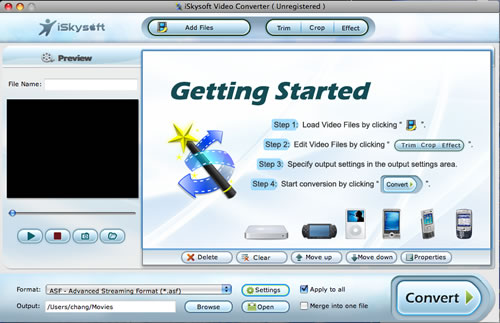
Tutorial: Edit FLV video with FLV Editor for Mac
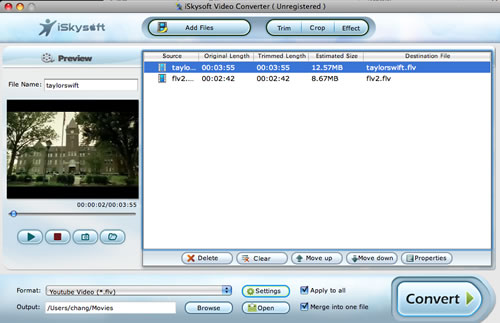
Step 1: Import FLV video files
Click the "Add Files" button to add FLV files to Mac FLV Editor.
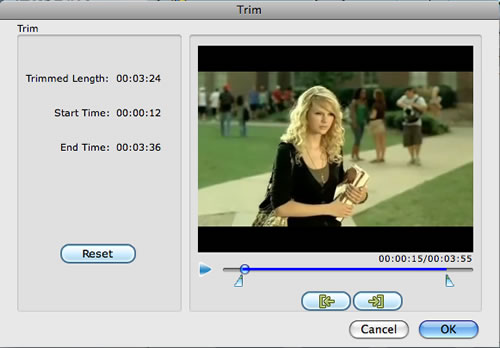
Step 2: Trim FLV video files
In Trim window, set the start time and end time by dragging the Time slider under the screen.
Step 3: Join multiple FLV files into one
Tick “merge into one file” option, you can join multiple FLV files into one.

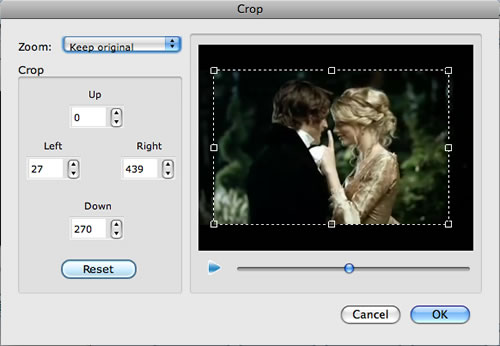
Step 4: Crop FLV video
In Crop window, specify an area around the FLV video by dragging the dashed-line on video.
Step 5: Add FLV video effects
Drag the effect adjustment sliders to set the video brightness, contrast, saturation and video volume. Choose a special effect from the Effect drop-down list for your FLV.

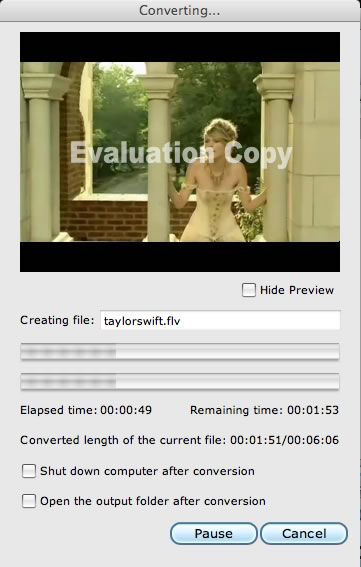
Step 6: Output Settings
Save FLV video project to the most appropriate output format.
Step 7: Start to Convert FLV
5:["$","$4",null,{"fallback":[[["$","link","css:/assets/_layout-BzYdn0f6.css",{"rel":"stylesheet","precedence":"vite-rsc/importer-resources","href":"/assets/_layout-BzYdn0f6.css","data-rsc-css-href":"/assets/_layout-BzYdn0f6.css"}],"$undefined"],["$","div",null,{"className":"flex justify-center items-center p-8","children":["$","div",null,{"className":"animate-spin rounded-full h-8 w-8 border-b-2 border-indigo-600"}]}]],"children":["$","div",null,{"className":"bg-white/95 mt-0.5 py-6 sm:py-12","children":["$","article",null,{"className":"mx-auto w-full max-w-2xl format format-sm sm:format-base lg:format-lg format-blue dark:format-invert","children":[["$","header",null,{"className":"mb-4 lg:mb-6 not-format","children":[["$","h1",null,{"className":"mb-4 text-3xl font-extrabold leading-tight text-gray-900 lg:mb-6 lg:text-4xl dark:text-white","children":"FLV Editor for Mac, Edit FLV, Convert FLV with Mac FLV Editor"}],["$","address",null,{"className":"flex items-center mb-6 not-italic","children":["$","div",null,{"className":"inline-flex items-center text-sm text-gray-900 dark:text-white","children":[["$","img",null,{"className":"mr-3 w-8 h-8 rounded-full","src":"$7","alt":"Caty"}],["$","a",null,{"href":"/author/caty_73463704322454","rel":"author","className":"font-bold capitalize hover:underline dark:text-white","children":"Caty"}],["$","span",null,{"className":"mx-1 text-md text-gray-400 dark:text-gray-500","children":"·"}],["$","span",null,{"className":"inline-flex items-center ml-1 text-gray-500 dark:text-gray-400","children":"2 min read"}],["$","span",null,{"className":"mx-1 text-md text-gray-400 dark:text-gray-500","children":"·"}],["$","time",null,{"dateTime":"Fri Mar 20 2009","className":"text-gray-500 dark:text-gray-400","children":"Mar 20, 2009"}],[["$","span",null,{"className":"mx-1 text-md text-gray-400 dark:text-gray-500","children":"·"}],["$","a","tips-and-tricks",{"href":"/t/tips-and-tricks","className":"capitalize text-sm text-gray-500 dark:text-gray-400 hover:text-gray-600","children":"tips & tricks"}]]]}]}]]}],["$","div",null,{"className":"lead prose mt-4 text-lg leading-8 text-gray-600","children":["$","div",null,{"dangerouslySetInnerHTML":{"__html":"$8"}}]}],"$L9","$La"]}]}]}]
b:T63b,M12.315 2c2.43 0 2.784.013 3.808.06 1.064.049 1.791.218 2.427.465a4.902 4.902 0 011.772 1.153 4.902 4.902 0 011.153 1.772c.247.636.416 1.363.465 2.427.048 1.067.06 1.407.06 4.123v.08c0 2.643-.012 2.987-.06 4.043-.049 1.064-.218 1.791-.465 2.427a4.902 4.902 0 01-1.153 1.772 4.902 4.902 0 01-1.772 1.153c-.636.247-1.363.416-2.427.465-1.067.048-1.407.06-4.123.06h-.08c-2.643 0-2.987-.012-4.043-.06-1.064-.049-1.791-.218-2.427-.465a4.902 4.902 0 01-1.772-1.153 4.902 4.902 0 01-1.153-1.772c-.247-.636-.416-1.363-.465-2.427-.047-1.024-.06-1.379-.06-3.808v-.63c0-2.43.013-2.784.06-3.808.049-1.064.218-1.791.465-2.427a4.902 4.902 0 011.153-1.772A4.902 4.902 0 015.45 2.525c.636-.247 1.363-.416 2.427-.465C8.901 2.013 9.256 2 11.685 2h.63zm-.081 1.802h-.468c-2.456 0-2.784.011-3.807.058-.975.045-1.504.207-1.857.344-.467.182-.8.398-1.15.748-.35.35-.566.683-.748 1.15-.137.353-.3.882-.344 1.857-.047 1.023-.058 1.351-.058 3.807v.468c0 2.456.011 2.784.058 3.807.045.975.207 1.504.344 1.857.182.466.399.8.748 1.15.35.35.683.566 1.15.748.353.137.882.3 1.857.344 1.054.048 1.37.058 4.041.058h.08c2.597 0 2.917-.01 3.96-.058.976-.045 1.505-.207 1.858-.344.466-.182.8-.398 1.15-.748.35-.35.566-.683.748-1.15.137-.353.3-.882.344-1.857.048-1.055.058-1.37.058-4.041v-.08c0-2.597-.01-2.917-.058-3.96-.045-.976-.207-1.505-.344-1.858a3.097 3.097 0 00-.748-1.15 3.098 3.098 0 00-1.15-.748c-.353-.137-.882-.3-1.857-.344-1.023-.047-1.351-.058-3.807-.058zM12 6.865a5.135 5.135 0 110 10.27 5.135 5.135 0 010-10.27zm0 1.802a3.333 3.333 0 100 6.666 3.333 3.333 0 000-6.666zm5.338-3.205a1.2 1.2 0 110 2.4 1.2 1.2 0 010-2.4z6:["$","footer",null,{"className":"bg-gray-900 dark:bg-gray-900","children":["$","div",null,{"className":"mx-auto max-w-7xl px-6 py-4.5 md:flex md:items-center md:justify-between lg:px-8","children":[["$","div",null,{"className":"flex justify-center space-x-6 md:order-2","children":[["$","a","Facebook",{"href":"https://facebook.com/gleeztech","target":"_blank","rel":"noopener noreferrer","className":"text-gray-400 hover:text-gray-500","children":[["$","span",null,{"className":"sr-only","children":"Facebook"}],["$","svg",null,{"className":"h-6 w-6","fill":"currentColor","viewBox":"0 0 24 24","aria-hidden":"true","children":["$","path",null,{"fillRule":"evenodd","d":"M22 12c0-5.523-4.477-10-10-10S2 6.477 2 12c0 4.991 3.657 9.128 8.438 9.878v-6.987h-2.54V12h2.54V9.797c0-2.506 1.492-3.89 3.777-3.89 1.094 0 2.238.195 2.238.195v2.46h-1.26c-1.243 0-1.63.771-1.63 1.562V12h2.773l-.443 2.89h-2.33v6.988C18.343 21.128 22 16.991 22 12z","clipRule":"evenodd"}]}]]}],["$","a","Instagram",{"href":"https://instagram.com/gleeztech","target":"_blank","rel":"noopener noreferrer","className":"text-gray-400 hover:text-gray-500","children":[["$","span",null,{"className":"sr-only","children":"Instagram"}],["$","svg",null,{"className":"h-6 w-6","fill":"currentColor","viewBox":"0 0 24 24","aria-hidden":"true","children":["$","path",null,{"fillRule":"evenodd","d":"$b","clipRule":"evenodd"}]}]]}],["$","a","X",{"href":"https://x.com/gleeztech","target":"_blank","rel":"noopener noreferrer","className":"text-gray-400 hover:text-gray-500","children":[["$","span",null,{"className":"sr-only","children":"X"}],["$","svg",null,{"className":"h-6 w-6","fill":"currentColor","viewBox":"0 0 24 24","aria-hidden":"true","children":["$","path",null,{"d":"M13.6823 10.6218L20.2391 3H18.6854L12.9921 9.61788L8.44486 3H3.2002L10.0765 13.0074L3.2002 21H4.75404L10.7663 14.0113L15.5685 21H20.8131L13.6819 10.6218H13.6823ZM11.5541 13.0956L10.8574 12.0991L5.31391 4.16971H7.70053L12.1742 10.5689L12.8709 11.5655L18.6861 19.8835H16.2995L11.5541 13.096V13.0956Z"}]}]]}],"$Lc"]}],"$Ld"]}]}]
9:null
a:["$","$4",null,{"fallback":["$","div",null,{"className":"comments-skeleton","children":[["$","div",null,{"className":"h-6 bg-gray-200 rounded w-32 mb-4 animate-pulse"}],["$","div",null,{"className":"space-y-3","children":[["$","div","1",{"className":"h-16 bg-gray-100 rounded animate-pulse"}],["$","div","2",{"className":"h-16 bg-gray-100 rounded animate-pulse"}],["$","div","3",{"className":"h-16 bg-gray-100 rounded animate-pulse"}]]}]]}],"children":"$Le"}]
c:["$","a","GitHub",{"href":"https://github.com/gleez","target":"_blank","rel":"noopener noreferrer","className":"text-gray-400 hover:text-gray-500","children":[["$","span",null,{"className":"sr-only","children":"GitHub"}],["$","svg",null,{"className":"h-6 w-6","fill":"currentColor","viewBox":"0 0 24 24","aria-hidden":"true","children":["$","path",null,{"fillRule":"evenodd","d":"M12 2C6.477 2 2 6.484 2 12.017c0 4.425 2.865 8.18 6.839 9.504.5.092.682-.217.682-.483 0-.237-.008-.868-.013-1.703-2.782.605-3.369-1.343-3.369-1.343-.454-1.158-1.11-1.466-1.11-1.466-.908-.62.069-.608.069-.608 1.003.07 1.531 1.032 1.531 1.032.892 1.53 2.341 1.088 2.91.832.092-.647.35-1.088.636-1.338-2.22-.253-4.555-1.113-4.555-4.951 0-1.093.39-1.988 1.029-2.688-.103-.253-.446-1.272.098-2.65 0 0 .84-.27 2.75 1.026A9.564 9.564 0 0112 6.844c.85.004 1.705.115 2.504.337 1.909-1.296 2.747-1.027 2.747-1.027.546 1.379.202 2.398.1 2.651.64.7 1.028 1.595 1.028 2.688 0 3.848-2.339 4.695-4.566 4.943.359.309.678.92.678 1.855 0 1.338-.012 2.419-.012 2.747 0 .268.18.58.688.482A10.019 10.019 0 0022 12.017C22 6.484 17.522 2 12 2z","clipRule":"evenodd"}]}]]}]
d:["$","div",null,{"className":"mt-8 md:order-1 md:mt-0","children":["$","p",null,{"className":"text-sm leading-5 text-gray-400","children":["© 2005 - ",2026," Gleez Inc. All rights reserved."]}]}]
e:["$","div",null,{"className":"mt-8","children":[["$","h3",null,{"className":"text-xl font-semibold mb-4","children":"Voices"}],["$","p",null,{"className":"text-gray-500","children":"Empty airwaves. Fill them with your thoughts!"}]]}]